|
Decals Explained by (29 August 2000) |
Return to The Archives |
Introduction
 |
|
So you have your little 3D engine up and running and all is well in 3D engine
land, except for one little thing. When bullets from your gun hit a wall, they
don't leave any marks. Wouldn't it be nice to have marks placed on the walls to
add an extra bit of realism to your engine? The solution to this little problem
lies in the use of decals. With decals you can leave bullet marks on walls, burn
marks on the floor from bomb detonations and even have blood splatter all over
when you kill monsters. In this article I will describe a simple method to generate decals which is straightforward, easy to implement and gives good results. |
|
Setup
|
|
Before we can place a decal on a face we need three bits of information. The
first bit of information we need is a point on the face(PT), the second bit is
the faces normal and the third bit is the size of the decal. The point on a face
that makes sense to use is the point where your objects path intersects the
face. This point normally comes from a ray triangle intersection test or a
collision detection routine, if you are having problems with this see the source
code for the demo at the end of this document. The face normal is an easy thing
to calculate and more than likely you already have normals calculated for all of
your geometry. If you are having trouble with normals try looking at this
document on normals for more information. The size of the decal is a trivial
piece of information, it is merely a number greater than zero which determines
how large the final decal will be. Once we have all of the aforementioned information we are ready to move onto the next step, finding the Right and Up vectors. |
|
Finding the Right and Up vectors
|
|
What are the Right and
Up vectors? The Right and Up vectors are vectors
which point right and up respectively on a given face. So why do we need
to bother with these vectors? These vectors are important because they
can be used to construct a new face that is coplanar with the original
face, an important property for our decals. Later on in this article you
will see how to use the Right and Up vectors to generate
a face around a given point, but for now we must concentrate on calculating
the vectors. The first vector that must be calculated is the Right vector. To calculate this vector take the cross product of the faces major axis and the faces normal. So what is a faces major axis? A faces major axis can either be X(1, 0, 0), Y(0, 1, 0), or Z(0, 0, 1). To determine a faces major axis, take the absolute value of the normals X, Y and Z components and then find the largest of the three values. If the X component is the largest, then the major axis is X, the same applies for the Y and Z components. Calculating the Right vector seems easy, but there is one problem with this calculation. When the face normal is equal to the major axis the result of the cross product between them is (0, 0, 0), not what we want. The solution to this problem is a simple one. When the face normal is equal to the major axis, the Right vector needs to be built by hand. Building the Right vector by hand is very simple, see the demo source code if you are unsure about how to build it. Now we must calculate the Up vector. Take the cross product of the faces normal and the Right vector and out pops your Up vector. Once the Right and Up vectors have been calculated, normalize both of them. Normalizing the vectors is very important so don't forget to do it. Now that we have our Right and Up vectors, lets take a look at the information we have gathered so far. In the image below the yellow dot is the point of intersection, PT, the red line is the faces normal, the green line is the Right vector and the blue line is the Up vector. 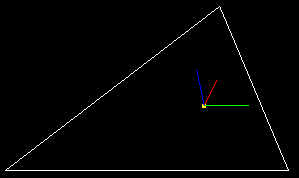 Armed with the Right and Up vectors, a point on the face(PT) and the Size of the decal we are ready to move onto the final step, building the decal face. |
|
Building The Decal Face
|
Building the decal face is
the easiest thing to do, it involves taking what we know and using it
to our advantage. Below is a simple image of what a finished decal face
would look like, it has four points (A, B, C and
D) and has its center at PT. 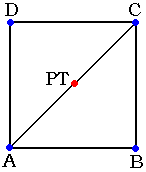 So, how do we calculate those four points? Below are the very simple equations for the four points. A = PT + ((-Right - Up) * Size)Now that the four points of the decal have have been obtained, they are ready to be rendered as triangles. I used the ordering above since I was rendering my decals as triangle fans, but you can use any ordering that you like. The image below shows what a decal would look like when applied to a face and rendered in wireframe. 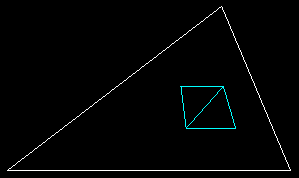 We are now finished generating our decal! We took three simple pieces of information and built a decal face from it that can be used to enhance your game. The question that we must be asking ourselves now is, what can we do to make this method better? |
|
How Can I Make This Better?
|
|
While this method is very easy, it does have its shortcomings. The first problem
is that the decals are not clipped to the faces which they are applied too. If a
decal is placed on the edge of a face and rendered you will get half the decal
on the face and the other half off. This becomes a problem when decals are
applied to corners and half of the decal hangs out into space. If you have
Quake3 Arena installed you can watch it clip decals as they are applied to the
world geometry while running in wireframe mode. Another shortcoming of this method is that a decal can only fall on one plane. An improvement would be to add a decal radius or something similar and determine which faces the decal could possibly be applied to and then fragment the decal so it can be applied to all of those faces. |
|
Demo And Code
|
|
What would an article be without
a demo? You can download the demo here. Source code is provided as usual. Here are some screen shots of the demo : shot01.jpg / shot02.jpg / shot03.jpg / shot04.jpg. Please see the readme.txt included with the demo for more information. |
|
Conclusion
|
|
Well, I hope that you find the article and demo useful in some way or another.
When I began to do work with decals I went looking on the net to see what other
people had done and found out that there was very little information available.
So, once I had my own code working well I decided to write this document since I
felt obligated to share with others what I learned. Hopefully this document will
help someone learn along the way. If you have a different method for generating decals I would love to hear about it. This method is the product of trial and error and I know there are better ways to tackle the problem. Please send any questions or comments to nkmiller@calpoly.edu. |
|
|